 tháng 6 06, 2012

When laid flat on your surface, this is what the card looks like. Notice the inside? What is that?

Voila......a squash fold on the inside for you to decorate:

And I'll even show you how to complete the squash fold!
Step 1:

You will need a "Bone Folder" and a piece of designer paper measuring 8" x 8".
Step 2:

Fold your paper in half diagonally and use your "Bone Folder" to press the fold in place.
Step 3:

Open your designer paper and fold again diagonally on the opposite side.
Step 4:

Open your designer paper and fold in half horizontally.
Step 5:

When you open your designer paper slightly, the photo above shows you what yours should look like at this point. Position your designer paper so it looks like the photo. Using both hands, push the two folds in the center so that they fold towards the center.
Step 6:

Push the folds in Step 5 to the center until you have a triangle shape and press with your "Bone Folder" to make things nice and flat.
Step 7:

Using the top 2 corners, fold them towards the center to form 2 small triangles. Fold both corners until they slightly touch end-to-end. Fold flat with your "Bone Folder".
Step 8:

Flip your designer paper over and repeat Step 7 for side 2.
Step 9:

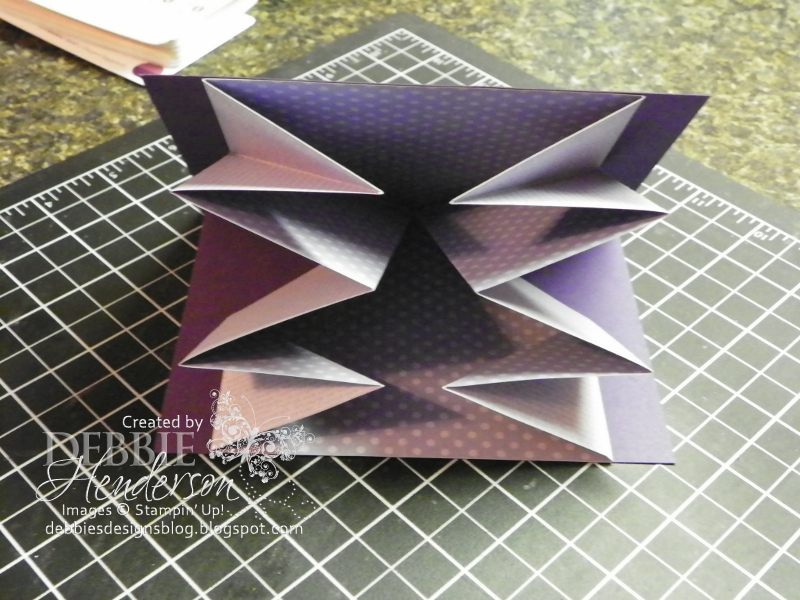
This is what your project now looks like. You will notice that each corner has "legs" hanging down. You will now take one leg at a time, open up the leg and push towards the inside of your project. The photo below shows where I opened and pushed one of the "legs" towards the inside:

Step 10:

Repeat Step 9 for all 4 corners and the photo above shows what your project should look like.
Step 11:

Push down on your project to lay it flat and using your "Bone Folder", press down to smooth all the folds.
Step 12:

Position your folded project inside your card close to the fold and glue in place on both sides. The photo below shows you what the squash fold looks like when completely glued in place:

Now decorate the inside:
And......completed card! Wasn't that fun and easy?

Card Supplies:
- Cardstock: Whisper White, Lucky Limeade, Wisteria Wonder, Elegant Eggplant
- Tools: Big Shot Machine, Labels Collection Framelits, 2 1/2" Circle Punch, Full Heart Punch, Scallop Border Trim Punch, Blender pen, Bone Folder
- DSP: In Color Paper Pack
- Stamps: Easy Events, Delightful Dozen
- Inks: Elegant Eggplant, Lucky Limeade
How would you like to learn more neat ways to create some of the most interesting projects? As most of you know, I am a designer for the Create with Connie & Mary team and we are in the middle of our "Early Bird Pricing". Sign up today to be the first to see the new projects, plus play along with our challenges, and win PRIZES just for joining! We keep our site up a year after the Edition is over so you can refer back to all the projects 24/7! We will have over 30 exclusive samples with step-by-step photo tutorials featuring the products in the Stampin' Up! New 2012 Catalog! You'll be able to use these tutorials ALL YEAR LONG! Customers and demonstrators welcome! Click HERE to be directed to our challenge site!


Không có nhận xét nào
Đăng nhận xét